1g Mig Welding Test
Are you ready to dive into the world of welding? Today, we’re going to tackle the 1G MIG welding test. In this introduction, we’ll break down what it is, why it’s important, and how to ace it. So let’s grab our helmets and get started!
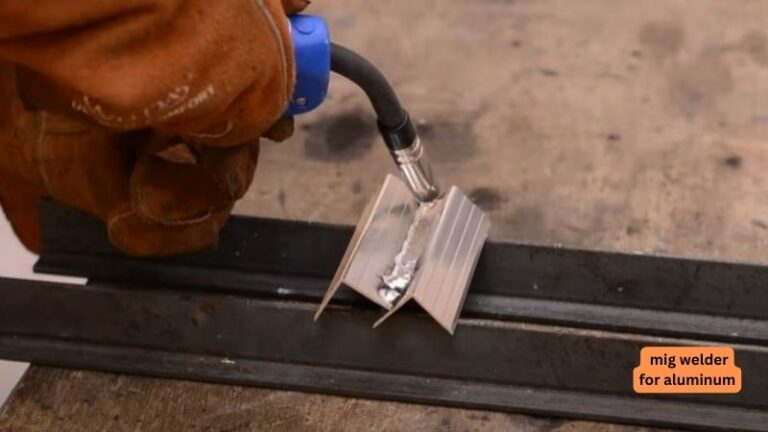
Now, you might be wondering, what exactly is the 1G MIG welding test? Well, it’s a specific type of welding test where you’ll be working with a MIG welding machine. MIG stands for Metal Inert Gas, and it’s a popular welding process used to join metal pieces together. In the 1G position, you’ll be welding a horizontal groove joint, which means the two pieces of metal are placed horizontally, and you’ll be welding them together from the top.
Why is this test important? Well, it’s a way for welders to showcase their skills and prove their proficiency in MIG welding. Employers often require prospective welders to pass certifications, and the 1G MIG welding test is a common one. By mastering this test, you’ll open up opportunities to work on exciting projects and increase your earning potential.
So, whether you’re considering a career in welding or simply want to expand your skill set, the 1G MIG welding test is a fantastic challenge to take on. Let’s dive deeper into the process, techniques, and tips that will help you succeed in this test. Get ready to spark your creativity and unleash your welding superpowers!
Looking to ace your 1G MIG welding test? Here’s a step-by-step guide to help you succeed. First, ensure you have the right equipment and safety gear. Prepare the joint by cleaning and beveling the edges. Set up your welding machine according to the material thickness and wire diameter. Position yourself and the welding gun correctly. Start welding with a steady motion, ensuring proper penetration. Remember to practice and refine your technique for the best results.

Mastering 1G MIG Welding Test: Tips, Techniques, and Challenges
MIG welding, also known as Gas Metal Arc Welding (GMAW), is a versatile and widely used welding process. One of the most crucial tests for MIG welders is the 1G MIG welding test. This test assesses a welder’s ability to produce quality welds in the flat or horizontal position. In this article, we will delve into the intricacies of the 1G MIG welding test, exploring the techniques, challenges, and tips to excel in this test.
The Basics of 1G MIG Welding Test
The 1G MIG welding test refers to welding in the flat or horizontal position. It is often considered a foundational skill for welders. In this position, the weld puddle is moved horizontally, ensuring proper bead size, penetration, and uniformity. The horizontal direction of the weld results in gravity affecting the molten metal differently, making it a challenging test.
To successfully pass the 1G MIG welding test, one must understand the welding parameters, joint preparation, and welding techniques. The test involves creating consistent and visually appealing weld beads with proper penetration and fusion. The overall objective is to produce a sound weld that meets the specified criteria, such as visual inspection, X-ray examination, or destructive testing.
Techniques for Mastering the 1G MIG Welding Test
1. Prepare the joint: The quality of the weld starts with proper joint preparation. Ensure the base metals are clean, free from rust, paint, or contaminants. Beveling the edges of the joint can improve penetration and strengthen the weld.
2. Set the machine parameters: The welding machine settings significantly influence the weld quality. Adjust the voltage, wire speed, and shielding gas flow to match the requirements of the specific material and test.
3. Maintain proper travel speed: Consistency in travel speed is crucial to achieve uniform bead size and penetration. Too slow or too fast travel speed can result in uneven welds or insufficient fusion.
4. Control the arc length: Maintaining the appropriate arc length is essential for a stable arc and consistent weld bead. Too close or too far of an arc length can lead to spatter, porosity, or lack of fusion.
5. Ensure proper shielding gas coverage: Adequate shielding gas coverage protects the weld pool from atmospheric contamination. Proper gas flow rate and nozzle positioning are necessary to prevent porosity or oxidation.
Common Challenges Faced in 1G MIG Welding Test
1. Lack of fusion: Insufficient fusion can be a common challenge in 1G MIG welding. It can occur due to improper heat input, incorrect travel speed, or inadequate joint preparation.
2. Inconsistent bead size: Uneven bead size can result from inconsistent travel speed or improper manipulation techniques. It is essential to maintain a smooth and steady motion to achieve consistent results.
3. Porosity: Porosity, or gas pockets within the weld, can weaken the joint. It can be caused by inadequate shielding gas coverage, dirt or contaminants on the base metal, or improper welding technique.
4. Spatter: Spatter refers to the small bits of molten metal that can be ejected from the weld. Excessive spatter can impact the appearance and integrity of the weld. Proper machine settings and technique can help minimize spatter.
Tips for Acing the 1G MIG Welding Test
1. Practice, practice, practice: Like any skill, mastering 1G MIG welding requires practice. Spend ample time practicing in the flat or horizontal position to develop consistency and control.
2. Focus on technique: Pay close attention to your welding technique, including hand positioning, travel speed, and arc length. Refining your technique will significantly impact the quality of your welds.
3. Seek feedback and guidance: Having an experienced welder or instructor provide feedback on your welds can be invaluable. They can offer guidance, point out areas for improvement, and help refine your skills.
4. Familiarize yourself with different materials: Different materials require different welding techniques. Take the time to familiarize yourself with the properties and characteristics of various metals to ensure optimal weld quality.
Common Challenges in MIG Welding and How to Overcome Them
1. Weld Porosity: Identifying and Addressing the Issue
Weld porosity is a common issue in MIG welding, regardless of the position being welded. It refers to the presence of small gas pockets within the weld, which can weaken the joint’s integrity. Porosity is often caused by inadequate shielding gas coverage, dirty or contaminated base metals, or improper welding techniques. To address this issue, follow these steps:
1. Ensure proper gas coverage: Make sure the shielding gas flow rate and nozzle positioning are optimized to protect the weld pool from contaminants.
2. Clean base metals: Thoroughly clean the base metals to remove any dirt, grease, or contaminants that can contribute to porosity. Utilize appropriate cleaning methods such as wire brushing or degreasing agents.
3. Adjust welding technique: Examine your welding technique and make necessary adjustments. Maintain a steady travel speed, control the arc length, and minimize abrupt starts and stops.
4. Check gas mixtures: Verify that the shielding gas mixture is suitable for the specific materials being welded. Improper gas mixtures can lead to porosity, so consult with experts or refer to welding procedure specifications (WPS).
2. Excessive Spatter: Tackling the Spark Shower
Spatter refers to the small bits of molten metal that can be ejected from the weld during the welding process. While some spatter is inevitable, excessive spatter can negatively impact the appearance and integrity of the weld. To reduce spatter, consider the following steps:
1. Adjust machine settings: Fine-tune the voltage, wire speed, and shielding gas flow rate to achieve optimal parameters for the specific material being welded. Experiment with different settings to find the sweet spot.
2. Clean contact tip and nozzle: Regularly clean the contact tip and nozzle to remove built-up spatter. Use appropriate cleaning tools like tip cleaners or reamers to ensure smooth wire feeding and gas flow.
3. Use anti-spatter agents: Apply anti-spatter sprays or gels to the workpiece or contact tip to minimize spatter adhesion. These products create a barrier that prevents spatter from sticking to the metal surface.
4. Review wire type and size: Different wires exhibit varying levels of spatter. Consider using low spatter wires designed for specific applications. Additionally, the wire size should be appropriate for the intended welding current.
3. Overheating and Distortion: Preserving the Integrity of the Weld
Overheating and distortion are common challenges when welding thicker materials or performing long welds. Excessive heat input can lead to warping, distortion, and even increased residual stresses. To tackle this issue, try the following:
1. Implement joint fit-up techniques: Employ appropriate joint fit-up techniques such as tack welding or clamping to minimize distortion during the welding process.
2. Use heat sinks: Utilize heat sinks or heat-absorbing materials near the weld area to dissipate excess heat and prevent distortion. Copper or aluminum blocks can be strategically placed to absorb heat.
3. Employ proper welding techniques: Adhere to proper welding techniques, including using a weaving or oscillating motion to distribute heat evenly. Consider employing preheating or post-welding heat treatment techniques for thicker materials.
In conclusion, the 1G MIG welding test is an essential evaluation for welders. Mastering this test requires a solid understanding of the welding parameters, joint preparation, and proper techniques. By practicing diligently, focusing on technique, and addressing common challenges, welders can excel in the 1G MIG welding test and ensure the production of high-quality welds. Remember to seek guidance from experienced welders and continuously refine your skills to become a proficient MIG welder.
Key Takeaways: 1G MIG Welding Test
- The 1G MIG welding test refers to the horizontal position welding test using a MIG (Metal Inert Gas) welding process.
- It is a commonly used welding test in industries to assess an individual’s welding skills and technique.
- Welders need to demonstrate their ability to produce strong and consistent welds with proper penetration and fusion.
- To pass the 1G MIG welding test, one should focus on maintaining a steady hand, controlling wire speed, and adjusting voltage as per the material thickness.
- Practicing proper cleaning and preparation of the metal surface before welding is crucial for successful test outcomes.
Frequently Asked Questions
Here are some commonly asked questions about the 1G MIG welding test and their answers:
What is a 1G MIG welding test?
A 1G MIG welding test is a type of welding certification test performed in the 1G position. The “G” stands for groove, which refers to the joint configuration between two pieces of metal. The test assesses a welder’s proficiency in using the MIG (Metal Inert Gas) welding process to create sound and structurally sound welds in a horizontal position.
During the test, the welder is required to deposit a specific amount of weld metal while maintaining proper technique and meeting certain quality requirements. The test is often used to qualify welders for specific welding jobs and projects.
What do I need to prepare for a 1G MIG welding test?
To prepare for a 1G MIG welding test, you need to familiarize yourself with the welding process, the different types of joints, and the specific requirements of the test. Practice your welding technique to ensure consistent and high-quality welds in the horizontal position.
You should also review the welding procedure specification (WPS) for the test, which outlines the specific parameters, such as welding current, voltage, and travel speed, that you need to follow. And don’t forget to dress appropriately with protective gear, including a welding helmet, gloves, and safety glasses.
How is a 1G MIG welding test conducted?
A 1G MIG welding test is typically conducted in a testing facility or workshop. The test involves welding a joint in a horizontal position, with the welder positioned above the joint. The welder will use a MIG welding machine and the appropriate welding electrode and shielding gas for the material being welded.
During the test, the welder will need to follow the specified welding procedure and deposit the required amount of weld metal while maintaining proper travel speed and technique. The resulting weld will be inspected for defects, such as cracks or incomplete fusion. The test may also include destructive testing, where the weld is subjected to bending or breaking to assess its strength.
What are the passing criteria for a 1G MIG welding test?
The passing criteria for a 1G MIG welding test may vary depending on the specific requirements of the test and the governing welding standards. Typically, the weld will be visually inspected for defects, such as lack of fusion or cracks. If the weld passes the visual inspection, it may be subjected to additional non-destructive or destructive testing to evaluate its quality and strength.
The specific criteria for passing the test, such as acceptable levels of defects or weld strength, will be outlined in the welding procedure specification (WPS) or the industry standards that govern the test. It’s essential to thoroughly review these criteria and ensure that your weld meets all the specified requirements.
How can I prepare for a 1G MIG welding test effectively?
To prepare for a 1G MIG welding test effectively, it’s crucial to practice your welding technique consistently. Focus on developing a stable and precise hand and arm position, maintaining proper travel speed, and controlling the welding parameters according to the requirements of the welding procedure specification (WPS).
In addition to practicing the actual welding technique, you should also familiarize yourself with the various types of joints and welding positions. Understand how the joint configurations and welding positions can influence the welding process and the quality of the resulting weld. Lastly, make sure to review any relevant welding codes and standards to ensure you are meeting the required specifications during the test.

Summary
So, to sum it up: a 1g MIG welding test is all about welding a flat plate in a horizontal position. It’s important to choose the right wire, gas, and amperage for a strong and clean weld. Practice and proper technique are key to mastering this welding test. Keep your bead consistent and watch out for any defects or imperfections. Remember, safety should always be a top priority when working with welding equipment. Happy welding!
In conclusion, a 1g MIG welding test involves welding a flat plate horizontally using the correct wire, gas, and amperage. It requires practice to develop the right technique and produce a solid weld. Safety is crucial throughout the process.