How To Weld Metal For Pipe Welding
Today we discuss How To Weld Metal For Pipe Welding. Welding is not just about joining two pieces of metal; it is an art form that requires precision and finesse. Pipe welding, in particular, demands a unique set of skills due to the complexity of working with cylindrical structures. Throughout this guide, we will walk you through the step-by-step process of preparing, setting up, and executing a successful weld on a pipe.
From understanding different types of metal and their properties to selecting the appropriate welding technique, we will cover it all. So, whether you are envisioning a career in pipe welding or simply looking to tackle a personal project, this guide will provide you with the knowledge and confidence to weld metal for pipe welding like a true professional.
How to Weld Metal for Pipe Welding:
- Prepare the metal surface by cleaning it with a wire brush to remove any rust or debris.
- Secure the metal pipes in the desired position using clamps or vices.
- Choose the appropriate welding method based on the type of metal and thickness.
- Set up the welding equipment and adjust the settings according to the metal and joint being welded.
- Start welding by creating a small tack weld to hold the pipes together.
- Move along the joint, applying the weld in a consistent and controlled manner.
- Ensure proper penetration and fusion between the pipes by observing the weld pool and adjusting the travel speed.
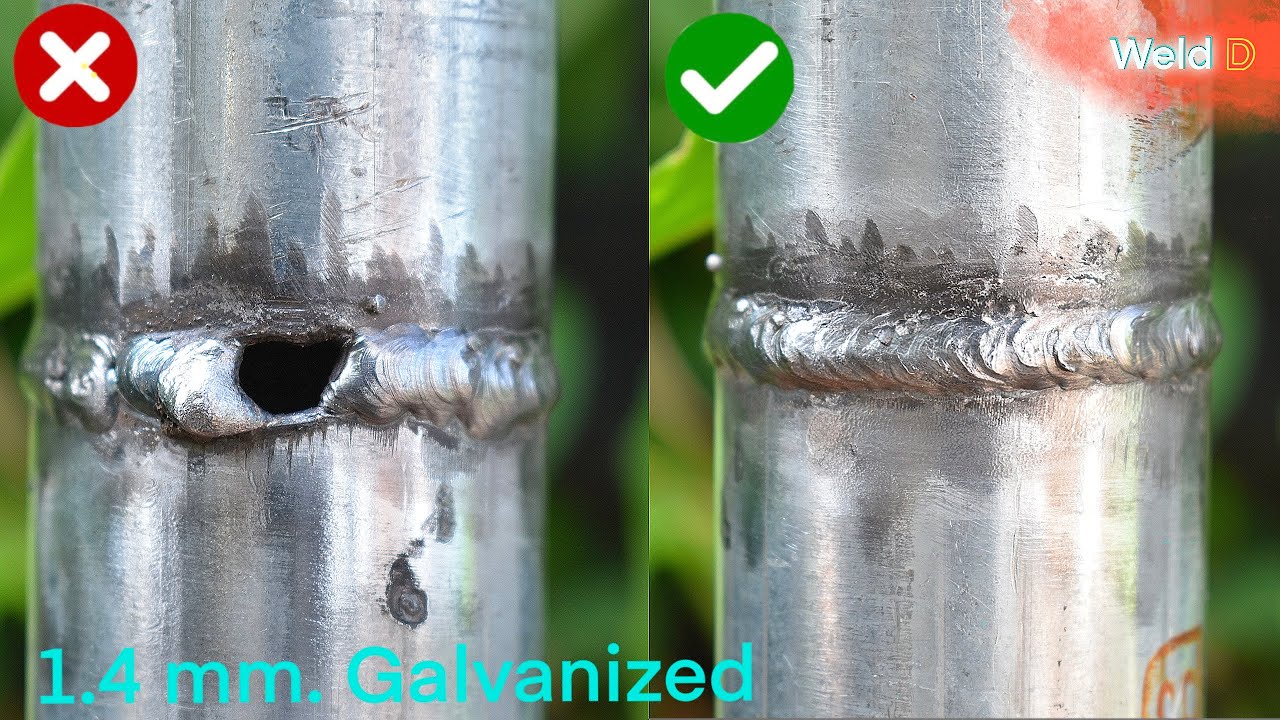
- Inspect the weld for any defects or imperfections and make necessary repairs if needed.
- After completing the welding process, allow the metal to cool down slowly to prevent any warping or cracking.
Introduction
Welding metal for pipe welding is a crucial skill for anyone working in the construction or manufacturing industry. Whether you are a professional welder or a DIY enthusiast, learning how to weld metal for pipe welding can save you time and money. In this article, we will provide you with a step-by-step guide on how to weld metal for pipe welding, ensuring that you have all the necessary information to successfully complete your welding project.
some steps To Weld Metal For Pipe Welding:
Step 1: Prepare Your Work Area
Before you start welding, it is essential to prepare your work area properly. Make sure you have a clean and well-ventilated space with adequate lighting. Remove any flammable materials from the vicinity and ensure that there are no tripping hazards. It is also crucial to have the necessary safety equipment, such as welding gloves, a welding helmet, and protective clothing.
Additionally, ensure that your work surface is sturdy and level. A stable work surface will help you maintain control over the welding process and produce high-quality welds. If necessary, use clamps or jigs to secure the metal pipes in the desired position to prevent movement during the welding process.
Step 2: Select the Appropriate Welding Method
There are several welding methods available for pipe welding, including stick welding, MIG welding, and TIG welding. The choice of welding method depends on factors such as the type of metal, the thickness of the pipes, and the desired strength of the welds. Research and determine the most suitable welding method for your specific project. Consult welding experts or refer to welding guidelines for recommendations.
Once you have chosen the appropriate method, ensure that you have the necessary welding equipment and consumables. This includes the welding machine, welding electrodes or wire, shielding gas (if applicable), and any other accessories required for the selected welding method.
Step 3: Prepare the Metal Pipes
Prior to welding, it is crucial to prepare the metal pipes to ensure proper adhesion and strong welds. Start by cleaning the surface of the pipes using a wire brush or grinder to remove any dirt, rust, or paint. This will help create a clean surface for better weld penetration.
Next, bevel the edges of the pipes to create a V-shaped groove. The depth and angle of the bevel depend on the thickness of the pipes and the welding method used. This beveled edge will provide more surface area for the weld, resulting in stronger and more reliable joints. Use a grinder or a pipe beveling machine to achieve precise and consistent beveled edges.
Step 4: Set Up Your Welding Equipment
Now that your work area is ready and the metal pipes are prepared, it’s time to set up your welding equipment. Follow the manufacturer’s instructions to assemble and connect the welding machine correctly. Ensure that all connections are secure and that the machine is in proper working condition.
Adjust the welding parameters according to the type and thickness of the metal pipes. This includes setting the appropriate amperage, voltage, and wire feed speed (if using a wire-fed welding method). Refer to welding charts or consult welding experts for the recommended settings. Properly set parameters will help you achieve optimal weld quality and prevent issues such as lack of fusion or excessive heat distortion.
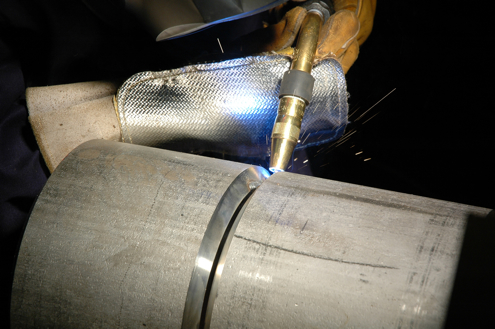
Step 5: Perform the Welding Process
Now it’s time to start the actual welding process. Position the welding torch or electrode holder at the starting point of the joint, ensuring a stable and comfortable position for you to maintain control throughout the weld. Maintain a consistent travel speed and angle as you move along the joint, ensuring proper penetration and uniform bead formation.
Keep a close eye on the welding pool and the metal pipes to ensure that the weld is progressing smoothly. Adjust your welding technique as necessary, such as increasing or decreasing the travel speed or adjusting the arc length. Continuous practice and experience will help you refine your welding skills and produce high-quality welds.
Step 6: Inspect and Finish the Weld
After completing the welding process, it is crucial to inspect the weld for any defects or imperfections. Use visual inspection techniques and, if necessary, non-destructive testing methods to ensure the weld’s integrity and quality. Address any issues or defects promptly to avoid compromising the strength and reliability of the weld.
Once you are satisfied with the weld’s quality, you can finish the weld by cleaning any slag or spatter and grinding down any uneven or protruding weld beads. This will ensure a smooth and aesthetically pleasing finish.
Step 7: Post-Weld Heat Treatment (if required)
Depending on the specific metal and welding requirements, post-weld heat treatment may be necessary to relieve residual stresses and improve the weld’s mechanical properties. Refer to industry standards or consult welding experts to determine if post-weld heat treatment is required for your specific project. Follow the recommended procedures and temperature ranges for the heat treatment process.
Remember to carefully monitor the temperature during the heat treatment process to avoid overheating or causing damage to the weld or the surrounding metal.
Step 8: Perform Post-Weld Inspection
After the weld has cooled down, perform a final inspection to ensure that the welding process has been successful. Check for any signs of cracking, distortion, or other defects that may affect the integrity of the weld. Use appropriate inspection methods, such as visual inspection, liquid penetrant testing, or radiographic testing, depending on the project requirements and industry standards.
If any defects are detected, take the necessary corrective actions, such as repairing or re-welding the affected areas, before proceeding with further steps.
Step 9: Clean and Protect the Welded Pipes
Once the welding process is complete and the weld has passed inspection, it is essential to clean and protect the welded pipes. Remove any remaining welding residues, such as slag or spatter, using appropriate cleaning methods. This will help prevent corrosion and maintain the weld’s appearance and performance over time.
Depending on the specific application and environmental conditions, consider applying a protective coating or paint to the welded pipes. This will provide an additional layer of protection against corrosion and extend the lifespan of the weld.
Step 10: Practice and Continuous Improvement
Finally, remember that welding is a skill that improves with practice and continuous learning. Keep practicing your welding techniques and seek opportunities to expand your knowledge and expertise. Stay updated with the latest advancements in welding technology and industry best practices to ensure that you are always producing high-quality welds that meet the required standards.
By following these steps and dedicating yourself to honing your welding skills, you will become a proficient pipe welder capable of tackling various welding projects with confidence.
faqs for Weld Metal For Pipe Welding:
To weld metal for pipe welding, you will need several essential tools and equipment. These include a welding machine (preferably TIG or MIG), welding electrodes or filler wire, a welding helmet or mask for protection, welding gloves, safety goggles, a chipping hammer, a wire brush, and a grinder. It is also important to have a welding table or workbench, clamps, and a vice to hold the pipe securely in place during the welding process.
Having the right tools and equipment is crucial for achieving high-quality welds and ensuring your safety while working with metal pipes.
There are several welding techniques commonly used for pipe welding, depending on the specific requirements of the project. The most commonly used techniques include Tungsten Inert Gas (TIG) welding, Metal Inert Gas (MIG) welding, and Shielded Metal Arc Welding (SMAW).
TIG welding is known for its precision and is often used for thin-walled pipes and critical applications. MIG welding is a versatile process suitable for both thick and thin pipes, providing high productivity. SMAW, also known as stick welding, is commonly used for outdoor and heavy-duty applications where portability is essential.
When welding metal for pipe welding, there are several key factors to consider to ensure proper weld quality. First, it is crucial to properly clean the pipe surface to remove any dirt, rust, or contaminants that could affect the weld. This can be done using a wire brush or a grinder.
Another important factor is selecting the correct welding technique and suitable welding parameters, such as current, voltage, and travel speed, based on the type and thickness of the pipe material. Additionally, maintaining the proper angle and distance between the welding torch or electrode and the pipe surface is essential for achieving consistent and strong welds.
Pipe welding can present various challenges that require careful consideration. One common challenge is achieving proper penetration and fusion between the base metal and the filler metal. This can be addressed by adjusting the welding parameters and techniques to ensure adequate heat input and control.
Another challenge is dealing with pipe alignment and fit-up issues. It is important to ensure that the pipes are properly aligned and fit together tightly, as gaps or misalignment can lead to weak welds or leaks. Proper use of clamps and fixtures can help overcome these challenges.
Welding metal for pipe welding involves working with high temperatures, sparks, and potentially harmful fumes. Therefore, it is crucial to follow proper safety precautions. Always wear appropriate personal protective equipment (PPE) such as welding helmets, gloves, safety goggles, and flame-resistant clothing.
Ensure good ventilation in the work area to minimize exposure to welding fumes. Avoid welding in confined spaces without proper ventilation. Additionally, be cautious of flammable materials nearby and keep a fire extinguisher within reach. Proper grounding of the welding equipment is also essential to prevent electric shock hazards.
conclusion:
mastering the art of welding metal for pipe welding is a valuable skill that opens up a world of possibilities in various industries. By understanding the different techniques, choosing the right equipment, and adhering to safety protocols, welders can create strong, durable, and structurally sound connections in pipes. This not only ensures the integrity of the pipes but also contributes to the overall safety and functionality of the structures they are a part of.
To become proficient in pipe welding, it is crucial to practice regularly and seek guidance from experienced professionals. As with any skill, it takes time, patience, and dedication to become a skilled pipe welder. However, the rewards are well worth the effort. With the ability to join pipes seamlessly, welders can contribute to the development of infrastructure, construction projects, and various industries. So, let us embrace the art of welding metal for pipe welding and unlock the potential to shape a better, sturdier, and more connected world.