Mastering Fillet Joint Welding: A Step-By-Step Guide
Looking to master the art of welding fillet joints? You’ve come to the right place. Welding fillet joints is a crucial skill for any aspiring welder, as these joints are commonly used in various applications, from automotive to construction. In this article, we’ll guide you through the process of welding fillet joints, step by step, ensuring that you have a solid understanding of the techniques and principles involved. So, let’s dive right in and learn how to weld fillet joints like a pro!

How to Weld Fillet Joints
Welding is a common metal fabrication process used in various industries. One of the most frequently encountered welding techniques is fillet welding. Fillet joints are simple, yet important, connections commonly used for joining two pieces of metal at a right angle. In this comprehensive guide, we will delve into the intricacies of welding fillet joints, exploring everything from the equipment required to the step-by-step process. So, let’s roll up our sleeves and dive into the world of welding fillet joints.
Section 1: Understanding Fillet Joints
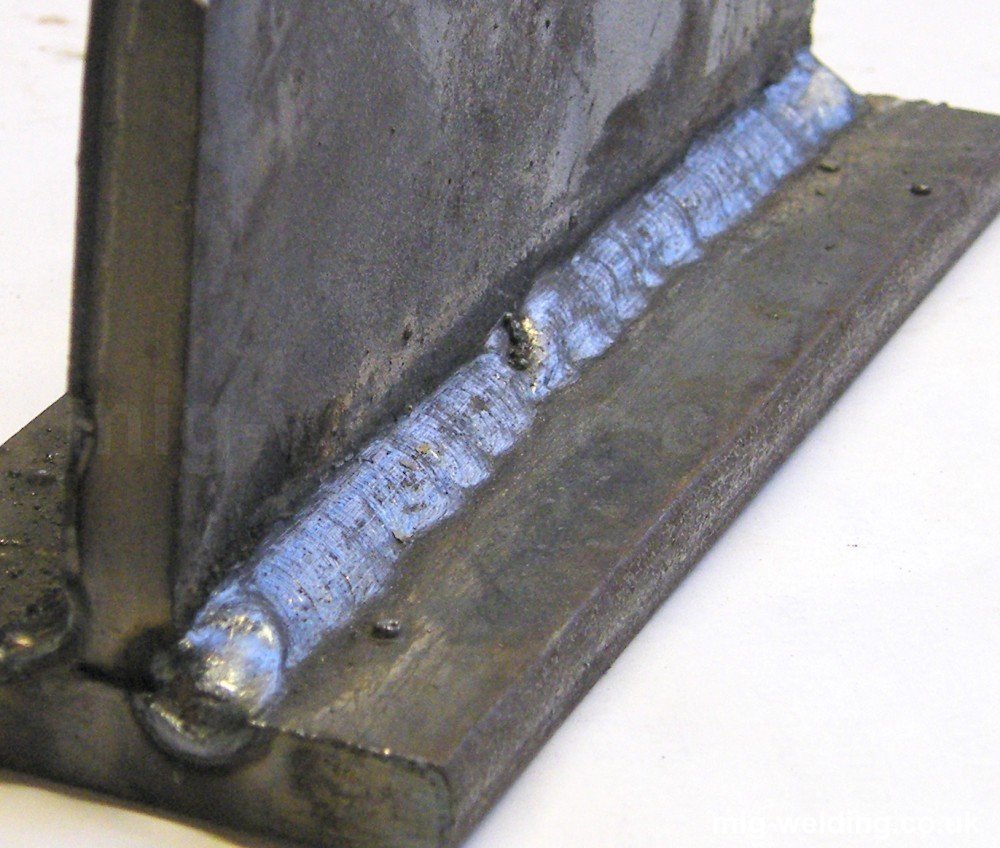
Before we embark on the journey of welding fillet joints, it’s essential to understand what they are and where they are typically used. Fillet joints are commonly found in applications such as construction, automotive, and structural engineering. They provide strength and stability to metal structures, ensuring load-bearing capabilities. Fillet welds are formed in the corner between the two intersecting pieces of metal. Understanding the different fillet joint types, sizes, and preparation techniques is crucial for achieving strong and durable welds.
Types of Fillet Joints
There are several types of fillet joints, each serving a specific purpose. The most common fillet joint designs include:
- Tee Joint: Formed when one piece of metal is connected perpendicular to another, creating a “T” shape.
- Lap Joint: Occurs when two pieces of metal overlap each other, resulting in a flush joint.
- Corner Joint: Created when two pieces of metal are joined at a right angle, forming a corner.
- Edge Joint: Involves joining two metal edges together to form a single seam.
Fillet Weld Sizes
The size of a fillet weld refers to its leg length, which determines the strength and stability of the joint. The American Welding Society (AWS) provides guidelines for fillet weld sizing based on the thickness of the metal being joined. Weld sizes can range from as small as 1/8 inch to several inches or more. It is crucial to select the appropriate weld size to ensure structural integrity and code compliance.
Preparing Fillet Joints
Proper preparation is key to achieving successful fillet welds. Before diving into the welding process, ensure the following steps are followed:
- Identify the joint type, material, and thickness.
- Clean the surfaces to be welded, removing any dirt, rust, or contaminants that may hinder the welding process.
- Bevel or chamfer the edges if necessary to ensure proper fusion and penetration.
- Ensure accurate fit-up and alignment of the pieces to be welded, minimizing gaps or misalignment.
Section 2: Equipment and Materials
To start welding fillet joints, you will need specific equipment and materials to ensure a successful outcome. Let’s take a look at the essential tools and supplies required for welding fillet joints:
Welding Machine
A welding machine, often referred to as a welder or welding power source, is the heart of any welding operation. It provides the necessary heat and electricity to create the weld. Choose a welding machine suitable for the type and thickness of the metal being welded, such as a stick welder, MIG welder, or TIG welder.
Electrodes/Wire
Selecting the appropriate electrode or wire is crucial to achieving strong fillet welds. The choice depends on the base metal, joint type, and welding process. Commonly used electrodes include E6010, E6013, E7018, while MIG welding often uses solid wire or flux-cored wire.
Welding Helmet
Protecting your eyes and face is essential when welding. A quality welding helmet with an appropriate darkening filter is a must-have to shield against harmful UV and IR radiation.
Protective Gear
Welding produces intense heat, sparks, and dangerous fumes. It’s crucial to wear appropriate protective gear such as welding gloves, flame-resistant clothing, welding aprons, and safety glasses to ensure personal safety.
Section 3: Step-by-Step Process of Welding Fillet Joints
Now that we have covered the basics let’s dive into the step-by-step process of welding fillet joints. Follow these guidelines for a successful welding operation:
Step 1: Set Up Your Work Area
Before starting, ensure you have a clean and organized work area. Position your metal pieces in the required joint configuration, and double-check alignment and fit-up.
Step 2: Prepare the Welder
Depending on the welding process you are using, prepare your welding machine accordingly. Set the correct voltage, amperage, and wire speed for MIG welding or select the appropriate electrode type and amperage for stick welding.
Step 3: Safety First
Put on all necessary safety gear, including your welding helmet, gloves, and protective clothing. Ensure your work area is properly ventilated to prevent the accumulation of harmful fumes.
Step 4: Strike an Arc/Start Welding
For stick welding, strike an arc by touching the electrode to the workpiece and quickly withdrawing it. For MIG or TIG welding, engage the trigger to start the wire feed and initiate the arc. Move the welding torch along the joint in a consistent motion, maintaining the desired weld size and penetration.
Step 5: Control Heat Input
Controlling heat input is crucial to avoid distortion, burn-through, or weak welds. Adjust the travel speed and amperage to achieve proper heat distribution. Maintain a steady pace while welding, ensuring consistent, even bead formation.
Step 6: Visual Inspection
Inspect the completed weld visually to ensure it meets the required quality standards. Look for complete fusion, proper penetration, and absence of defects such as porosity or cracks.
Step 7: Post-Weld Cleaning
Once the weld has cooled, remove any slag or spatter using a wire brush or chipping hammer. Clean the weld area to prepare it for any subsequent processes or inspections.
Section 4: Common Challenges and Troubleshooting
While welding fillet joints, you might encounter certain challenges that can affect the quality of your welds. Let’s discuss some common issues and their solutions:
Insufficient Penetration
If your weld lacks proper penetration, it may compromise the joint’s strength. Increase the amperage, slow down your travel speed, or adjust the electrode angle to achieve deeper penetration.
Excess Heat/Burn-Through
Burning through the metal can weaken the joint and cause distortion. Reduce the heat input by decreasing amperage, increasing travel speed, or using a smaller electrode or wire size.
Porosity
Porosity appears as small, gas-filled holes in the weld, weakening its integrity. Ensure proper cleaning of the base metal, use dry electrodes or wire, and check gas flow rate to minimize porosity.
Section 5: Advantages and Applications of Fillet Joints
Fillet joints offer several advantages and find applications in various industries. Let’s explore the benefits and common applications of fillet welding:
Advantages of Fillet Joints:
- Simple and cost-effective joint design
- Provides excellent load-bearing capabilities
- Requires minimal surface preparation compared to other joint types
- Offers versatility in joint configurations and metal types
Common Applications of Fillet Joints:
- Structural steel fabrication
- Automotive chassis and frame construction
- Pipeline and pressure vessel welding
- Shipbuilding and offshore structures
- General metal fabrication and repair work
Section 6: Conclusion
Mastering the art of welding fillet joints is a valuable skill for any aspiring welder or metal fabricator. With a solid understanding of fillet joint types, preparation techniques, and proper welding procedures, you can create strong and reliable connections. Remember to follow safety guidelines, choose the appropriate equipment, and troubleshoot any issues that may arise. Whether you’re building structures, repairing machinery, or working on DIY projects, fillet welding is an essential technique that unlocks endless possibilities.
Remember, practice makes perfect, so grab your welding gear, dive into the world of fillet welding, and start creating strong and beautiful welds.
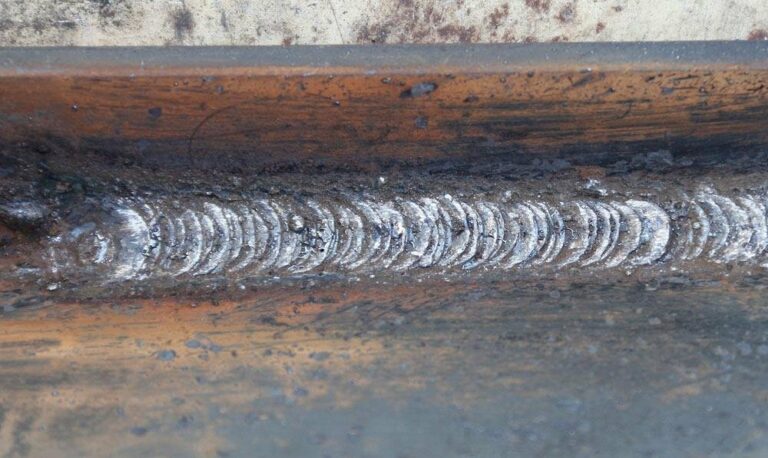
Fillets Welds | Multi-pass 7018 All the Way Out
Frequently Asked Questions
What is a fillet joint in welding?
A fillet joint in welding is a type of joint where two pieces of metal are joined together at a right angle, with the weld forming a triangular shape between the two surfaces. It is commonly used to connect T-joints, lap joints, and corner joints.
What are the different types of fillet welds?
There are three main types of fillet welds: convex, concave, and flat. Convex fillet welds have a raised surface at the center, concave fillet welds have a depressed surface, and flat fillet welds have a flat surface along the joint.
What equipment do I need to weld fillet joints?
To weld fillet joints, you will need a welding machine (such as a MIG welder or a TIG welder), welding electrodes or filler wire, welding gloves, a welding helmet, and safety goggles. Additionally, you may need clamps or vice grips to hold the pieces in place.
What are some important considerations when welding fillet joints?
When welding fillet joints, it is crucial to ensure proper fit-up of the pieces to be welded. The joint surfaces should be clean and free of any contaminants, and the welding machine should be set to the appropriate parameters for the type and thickness of the metal being welded. It is also important to maintain a steady welding speed and angle to achieve a strong and consistent weld.
What techniques can I use to weld fillet joints?
Two commonly used techniques for welding fillet joints are the drag technique and the push technique. In the drag technique, the electrode or filler wire is dragged along the joint in the direction of the weld, while in the push technique, the electrode or filler wire is pushed into the joint away from the welder. Both techniques can be effective, but the choice depends on the preference and skill level of the welder.
How do I ensure the quality of fillet welds?
To ensure the quality of fillet welds, it is important to inspect the welds visually and, if necessary, using non-destructive testing methods. The weld should be free of any cracks, porosity, or undercutting. It should also have good fusion with the base metal and proper reinforcement. If any defects are found, they should be repaired before the joint is put into service to ensure its strength and integrity.
Final Thoughts
In conclusion, mastering the art of welding fillet joints requires a combination of knowledge, practice, and precision. By following the step-by-step process outlined in this article, welders can ensure strong and reliable joints. Remember to clean the surfaces thoroughly, select the appropriate electrode, and maintain a steady hand during the welding process. Additionally, it is essential to prioritize safety by wearing appropriate protective gear and working in a well-ventilated area. With these guidelines in mind, anyone can become adept at welding fillet joints and achieve optimal results in their welding projects.