Master The Art Of Welding Corner Joints | Step-By-Step Guide
Looking to learn how to weld corner joints? You’ve come to the right place! Mastering the art of welding can open up a world of possibilities, allowing you to create strong and structurally sound connections. In this article, we’ll walk you through the step-by-step process of welding corner joints, providing you with the knowledge and techniques you need to achieve professional results. So grab your welding helmet and let’s dive into the exciting world of welding corner joints!

How to Weld Corner Joints
Welding is a versatile and essential skill in various industries, including construction, automotive, and manufacturing. One of the fundamental techniques every welder should master is welding corner joints. Corner joints are commonly found in structures where two pieces of metal intersect at a right angle. Whether you’re a beginner or looking to improve your welding skills, this guide will walk you through the step-by-step process of welding corner joints. By following these instructions, you’ll be well on your way to creating strong and durable welds.
Section 1: Understanding Corner Joints
Before diving into the welding process, it’s important to have a clear understanding of what corner joints are and how they work. Let’s take a closer look:
1.1 What is a Corner Joint?
A corner joint is a type of weld joint where two pieces of metal come together at a right angle. It is commonly used to join structural components, frames, or boxes. Corner joints provide stability and strength to the overall structure, making them a vital part of many welding projects.
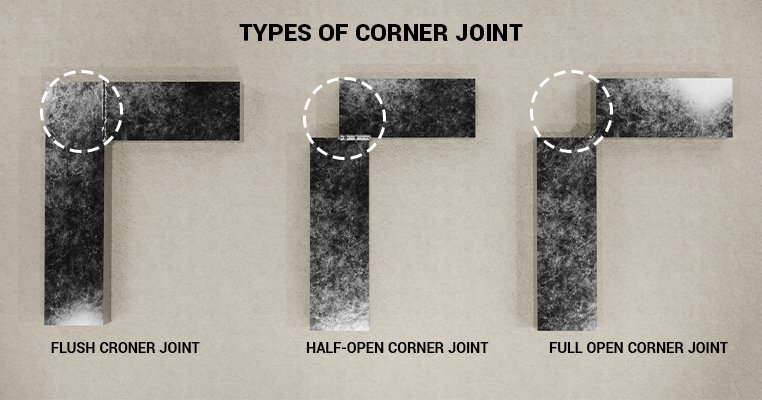
1.2 Types of Corner Joints
There are several types of corner joints, each serving a specific purpose. Understanding these variations will help you choose the appropriate welding technique and ensure a successful weld. Here are the most common types of corner joints:
1.2.1 Butt Joint
The butt joint is the simplest type of corner joint, where two pieces of metal simply meet at a 90-degree angle without any overlap.
1.2.2 T-Joint
As the name suggests, the T-joint resembles the letter “T” when two metal pieces intersect. One metal piece is perpendicular to the other, forming a right angle.
1.2.3 Lap Joint
In a lap joint, one piece of metal overlaps the other at the joint. This type of joint provides more surface area for welding, resulting in increased strength.
1.2.4 Miter Joint
Miter joints are commonly used in woodworking, but they can also be found in metal fabrication. In this joint, the two metal pieces meet at a 45-degree angle, creating a diagonal seam.
Section 2: Preparing for Welding
Before you start welding, proper preparation is crucial to ensure a successful weld. This section covers the essential steps to take before beginning the welding process.
2.1 Safety Precautions
Welding involves intense heat, bright light, and potential hazards, so prioritizing safety is paramount. Make sure to follow these safety precautions:
- Wear appropriate personal protective equipment (PPE) such as welding gloves, a welding helmet, and a flame-resistant jacket.
- Ensure proper ventilation in your workspace to prevent inhalation of harmful fumes and gases.
- Keep a fire extinguisher nearby to quickly handle any potential fires.
2.2 Selecting the Right Welding Technique
Choosing the correct welding technique is crucial to achieving strong and high-quality corner joints. The appropriate technique will depend on factors such as the type and thickness of the metal being welded. Here are some common welding techniques used for corner joints:
- Shielded Metal Arc Welding (SMAW): Also known as stick welding, SMAW uses a consumable electrode coated in flux to create the weld.
- Gas Metal Arc Welding (GMAW): GMAW, or MIG welding, utilizes a wire electrode and shielding gas to create the weld.
- Flux-Cored Arc Welding (FCAW): FCAW is similar to GMAW but uses a flux-filled electrode, eliminating the need for an additional shielding gas.
- Gas Tungsten Arc Welding (GTAW): GTAW, or TIG welding, uses a non-consumable tungsten electrode and a separate filler metal.
2.3 Cleaning and Preparing the Metal
Properly cleaning and preparing the metal surfaces is crucial for achieving strong welds. Here’s an outline of the steps involved:
2.3.1 Remove any dirt, rust, or paint from the metal using a wire brush or sandpaper.
2.3.2 Ensure the metal pieces are cut and shaped to fit together precisely at a 90-degree angle.
2.3.3 Bevel the edge of the metal if necessary. Beveling involves cutting an angle along the metal edge to increase the weld’s strength and penetration.
2.3.4 Use a degreaser or solvent to clean the metal thoroughly and remove any oils or contaminants that could negatively affect the weld.
Section 3: Welding Corner Joints
Now that you’ve prepared the metal and selected the appropriate welding technique, it’s time to dive into the welding process.
3.1 Choosing the Correct Electrode or Filler Metal
The choice of electrode or filler metal will depend on the type of metal being welded. Different metals require specific types of electrodes to ensure a strong and durable weld. Consult the electrode or filler metal manufacturer’s recommendations for the best results.
3.2 Set Up Your Welding Equipment
Setting up your welding equipment correctly is crucial for achieving precise and clean welds. Follow these steps to prepare your welding machine:
3.2.1 Check the machine’s polarity settings to ensure they match the electrode or filler metal being used.
3.2.2 Set the appropriate voltage and amperage settings based on the metal’s thickness and the electrode manufacturer’s recommendations.
3.2.3 Install the correct electrode or filler metal and ensure it is securely connected.
3.3 Welding Technique
Now it’s time to put the welding technique into action. Follow these steps for a successful weld:
3.3.1 Position the electrode or filler metal at the corner joint’s starting point.
3.3.2 Hold the electrode or filler metal at a 10-15 degree angle towards the direction of the weld, ensuring good contact with both metal pieces.
3.3.3 Start the arc or gas flow, then slowly move the electrode or filler metal along the joint in a steady motion. Maintain a consistent travel speed to ensure uniform welds.
3.3.4 Keep an eye on the weld pool and ensure it adequately penetrates the joint without creating excessive spatter or undercutting.
3.3.5 Continue welding until you reach the end of the joint, ensuring complete fusion between the metal pieces.
Section 4: Post-Welding Steps
Once the welding is complete, there are additional steps to ensure a proper finish and long-lasting weld.
4.1 Allow the Weld to Cool
After welding, it’s important to let the weld cool naturally. Avoid cooling it rapidly, as this can lead to cracks or other defects.
4.2 Inspect and Clean the Weld
Inspect the completed weld for any defects such as cracks, porosity, or insufficient penetration. If necessary, clean the weld using a wire brush to remove any slag or spatter.
4.3 Apply Post-Weld Treatment
Depending on the application and metal type, you may need to apply post-weld treatments such as grinding, smoothing, or painting for aesthetic and protection purposes.
Section 5: Troubleshooting Common Welding Issues
Even experienced welders encounter challenges during the welding process. Here are some common welding issues and tips on how to troubleshoot them:
5.1 Porosity
Porosity refers to small holes or bubbles in the weld caused by gas entrapment. To reduce porosity, make sure the metal surface is clean, avoid excessive moisture, and check the gas flow settings.
5.2 Lack of Fusion
Lack of fusion occurs when the weld fails to bond adequately with the base metal. Ensure proper heat settings, electrode angle, and travel speed to achieve good fusion.
5.3 Undercutting
Undercutting refers to a groove or depression along the weld joint’s edges. To minimize undercutting, maintain a consistent travel speed and adjust the welding machine settings accordingly.
Section 6: Conclusion
Mastering the art of welding corner joints is an essential skill for any aspiring or experienced welder. By understanding the different types of corner joints, preparing the metal surfaces adequately, selecting the right welding technique, and following proper welding techniques, you can create strong and high-quality corner welds. Remember to prioritize safety, practice diligently, and troubleshoot common welding issues as they arise. With time and experience, you’ll become proficient in welding corner joints and unlock a world of possibilities in the welding industry.
Finally, the journey of learning to weld corner joints doesn’t end here. Keep practicing, exploring new techniques, and expanding your knowledge to become a versatile and skilled welder.
MIG Welding Outside Corner Joints: Part 1 of 3 – Carbon Steel | MIG Monday
Frequently Asked Questions
What are the basic techniques for welding corner joints?
The basic techniques for welding corner joints involve proper preparation, selecting the appropriate welding method, and ensuring proper bead placement. It is essential to clean the surfaces to be joined, ensuring they are free from dirt, rust, and other contaminants. The next step is to select the suitable welding method for the material being used, such as MIG (Metal Inert Gas), TIG (Tungsten Inert Gas), or Stick welding. Finally, ensuring the proper placement of the weld bead, paying attention to the angle and speed, will help achieve a strong and sound corner joint.
What safety precautions should be taken while welding corner joints?
When welding corner joints, it is crucial to prioritize safety. Always wear appropriate protective gear, such as welding gloves, a welding helmet with a proper shade of lens, and fire-resistant clothing. Ensure proper ventilation in the work area to minimize exposure to hazardous fumes and gases. Additionally, keep a fire extinguisher nearby and be cautious of potential fire hazards. Regularly inspect and maintain welding equipment to avoid malfunctions during use.
Which welding positions are commonly used for corner joints?
The most commonly used welding positions for corner joints are the flat position and the horizontal position. In the flat position, the welding is done on the upper surface of the joint. The horizontal position involves welding along the joint’s sides while it is positioned horizontally. These positions provide better accessibility and control during welding, resulting in stronger and more aesthetically pleasing corner joints.
What are some common mistakes to avoid when welding corner joints?
Some common mistakes to avoid when welding corner joints include inadequate cleaning of the joint surfaces, improper selection of welding parameters, and inconsistent bead placement. Insufficiently cleaned surfaces can lead to weak welds. Improper selection of welding parameters, such as incorrect current or voltage settings, can result in poor fusion and weak joints. Inconsistent bead placement can cause uneven distribution of heat and compromise the joint’s strength. It is essential to take time to prepare and practice proper welding techniques to avoid these mistakes.
What types of filler metals should be used for welding corner joints?
The choice of filler metal depends on the base materials being welded. For steel corner joints, commonly used filler metals include ER70S-6 for MIG welding and E6013 or E7018 for Stick welding. These filler metals provide good strength and penetration when used with steel. For aluminum corner joints, ER4043 or ER5356 filler metals are commonly used. It is important to select the appropriate filler metal compatible with the base material to achieve a high-quality and durable weld.
Final Thoughts
In conclusion, mastering the art of welding corner joints is a valuable skill for any welder. By following the steps outlined in this article and focusing on proper preparation, alignment, and technique, welders can ensure strong and durable corner joints. Remember to clean the surfaces thoroughly, use the appropriate welding method, and maintain a steady hand for optimal results. Whether you are a beginner or an experienced welder, understanding how to weld corner joints is essential for successful metal fabrication projects. Keep practicing and refining your techniques to create high-quality welds every time.