Master The Art Of Welding With Pulse Settings In 7 Simple Steps
Looking to improve your welding skills? Want to know how to weld with pulse settings? Look no further! In this article, we’ll dive straight into the world of pulse settings and show you how to take your welding abilities to the next level. Whether you’re a beginner or an experienced welder, understanding pulse settings can greatly enhance the quality and efficiency of your welds. So, let’s get started and explore the ins and outs of how to weld with pulse settings for optimal results. Excited? Let’s jump right in!

How to Weld with Pulse Settings
Introduction
Welding is an essential process utilized in various industries, from construction to automotive manufacturing. While there are different welding techniques available, one method that offers enhanced control and precision is welding with pulse settings. Pulse welding allows for greater control over heat input, minimizing distortion, and improving overall weld quality. In this article, we will delve into the intricacies of welding with pulse settings, providing you with comprehensive insights and tips to master this technique.
Understanding Pulse Welding
Pulse welding is a technique that alternates between high and low current levels during the welding process. This pulsating current helps regulate the heat input and offers several advantages over conventional welding methods. By controlling the duration and frequency of the pulses, welders can achieve finer control over the weld pool and minimize the risk of defects.
Benefits of Pulse Welding
Pulse welding offers various benefits, including:
- Reduced heat input: Pulse welding enables welders to limit the heat input to the workpiece, reducing the potential for distortion and warping.
- Improved control: With pulse settings, welders have greater control over the weld pool, allowing for precise fusion and penetration.
- Enhanced aesthetics: This technique produces visually appealing welds with a more uniform appearance.
- Minimized spatter: Pulse welding can help reduce spatter formation, resulting in cleaner welds that require less post-weld cleaning.
- Increased efficiency: By optimizing the welding parameters, pulse welding can increase productivity and reduce overall welding time.
Choosing the Right Equipment
To weld with pulse settings effectively, it’s crucial to have the appropriate equipment. Here are some considerations when selecting your welding setup:
Power Source
A welding power source capable of pulse welding is necessary. Look for a machine that offers pulse functions and adjustable parameters to tailor the welding process to your specific needs.
Welding Gun
Ensure that your welding gun is compatible with the pulse welding feature. The gun should have the necessary controls and settings to adjust the pulse parameters effectively.
Wire and Shielding Gas
Select the appropriate welding wire and shielding gas for your application. Consult the wire manufacturer’s recommendations and welding procedure specifications to ensure compatibility with pulse welding.
Setting Up Your Welding Machine
Once you have the right equipment, it’s crucial to set up your welding machine correctly for pulse welding. Follow these steps:
Consult the Manufacturer’s Guidelines
Every welding machine has its own unique settings and controls. Refer to the manufacturer’s guidelines to understand how to access and adjust the pulse welding settings accurately.
Choose the Pulse Frequency
The pulse frequency determines how frequently the current alternates between high and low levels. Higher frequencies (Hz) are suitable for thin materials, while lower frequencies are ideal for thicker sections. Experiment with different frequencies to find the optimal setting for your welding project.
Select the Pulse Duration
The pulse duration refers to the time spent in the high or low current phase. Longer pulse durations provide deeper penetration, while shorter durations are suitable for welding thinner materials. Adjust the pulse duration to achieve the desired weld characteristics.
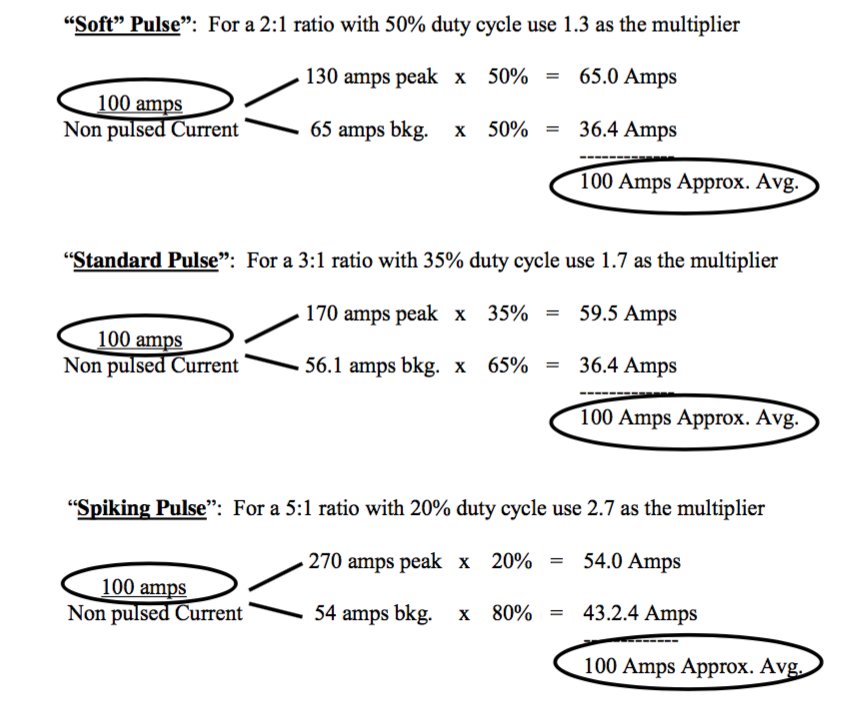
Adjust the Peak and Background Current
The peak current represents the higher current level during the pulse, while the background current is the lower level. The peak current affects penetration, while the background current controls heat input. Find the right balance of peak and background currents to achieve the desired weld profile and minimize distortion.
Techniques for Welding with Pulse Settings
Now that you have your equipment set up, let’s delve into some techniques to improve your welding results with pulse settings:
Torch Manipulation
Proper torch manipulation is crucial for optimal weld pool control. Maintain a steady travel speed and hold the torch at the correct angle to ensure proper penetration and fusion. Practice consistent movements to achieve uniform weld beads.
Manage Heat Input
One of the advantages of pulse welding is the ability to control heat input. Adjusting the pulse settings allows you to manage heat input effectively. Use higher peak currents for thicker materials and lower background currents for thinner ones. This technique helps prevent burn-through or insufficient penetration.
Monitor the Weld Pool
Keep a close eye on the weld pool during pulse welding. The pulsating current can make the pool more visible, enabling you to monitor its size and shape. Adjust the pulse settings in real-time to ensure a stable and well-formed weld pool.
Welding with pulse settings provides welders with enhanced control, reduced distortion, and improved weld quality. By understanding the benefits, selecting the right equipment, and following proper techniques, you can master this versatile welding method. Experiment with different pulse parameters and practice consistently to refine your skills and achieve exceptional welding results.
Please remember to follow the necessary safety precautions when welding and refer to the specific guidelines provided by your equipment manufacturer. Happy pulse welding!
Pulse Welding: A Beginners Guide
Frequently Asked Questions
What is welding with pulse settings?
Welding with pulse settings refers to a welding technique where the welding power source delivers a series of high and low voltage pulses to the welding arc. This pulsing action allows for greater control over the heat input, resulting in improved weld quality and reduced distortion.
Why would I choose to weld with pulse settings?
Welding with pulse settings offers several benefits. It allows for better control over the weld pool, reduces the heat-affected zone, minimizes distortion and warping, improves bead appearance, and enables welding on thin materials without burn-through.
How do I set up pulse welding?
To set up pulse welding, you typically need to adjust parameters such as pulse frequency, peak current, background current, and pulse width. These settings may vary depending on factors like the base material, joint design, and welding position. Refer to the welding machine’s manual or consult with an experienced welder to determine the appropriate pulse settings for your specific application.
What materials are suitable for pulse welding?
Pulse welding can be used on various materials, including stainless steel, aluminum, titanium, and other alloys. It is particularly beneficial when welding materials that are susceptible to heat distortion or when joining dissimilar metals with different melting points.
What are some tips for welding with pulse settings?
When welding with pulse settings, it is essential to maintain proper travel speed, maintain a consistent arc length, and ensure adequate shielding gas coverage. Additionally, staying within the recommended parameters, practicing on scrap before attempting critical welds, and having a clean workpiece surface can contribute to achieving successful welds.
Can pulse welding improve productivity?
Yes, pulse welding can enhance productivity in certain applications. The ability to weld at higher speeds, reduce the need for post-welding cleanup, and achieve higher-quality welds with minimal distortion can lead to time and cost savings. However, it is crucial to determine if pulse welding is suitable for your specific project requirements.
Final Thoughts
Welding with pulse settings can greatly enhance the quality and efficiency of your welding projects. Pulse settings allow for precise control over heat input, minimizing the risk of distortion or burn-through. By adjusting the pulse frequency and duration, welders can achieve cleaner, deeper penetration and better fusion of metals. Additionally, pulse welding reduces spatter and minimizes the need for post-weld cleaning, saving both time and effort. When using pulse settings, it is crucial to consider factors such as material thickness, joint configuration, and desired weld appearance. With practice and a thorough understanding of pulse parameters, welders can confidently produce high-quality welds with improved control and precision. Whether you are a beginner or an experienced welder, mastering how to weld with pulse settings is a valuable skill that can significantly elevate your welding capabilities.