How To Weld Metal With An Arc Welder
Today we discuss How To Weld Metal With An Arc Welder. Arc welding is a versatile and widely used method of joining metals together by creating an electric arc between a welding electrode and the workpiece. It is known for its simplicity, effectiveness, and ability to produce strong and durable welds. In this comprehensive guide, we will cover everything you need to know to get started with arc welding.
From understanding the equipment and safety precautions to mastering the proper techniques and troubleshooting common issues, you will gain the confidence and skills to tackle your own welding projects with ease. So, put on your safety gear, and let’s embark on this exciting journey to becoming a skilled arc welder.

Welding metal with an arc welder is a fundamental skill that every aspiring welder should learn. Whether you are a DIY enthusiast or a professional metalworker, knowing how to effectively use an arc welder can open up a world of possibilities for your projects. In this comprehensive guide, we will walk you through the step-by-step process of welding metal with an arc welder, covering everything from preparing the materials to executing the weld with precision.
How To Weld Metal With An Arc Welder:
Step 1: Safety Precautions
Prior to starting any welding project, it is essential to prioritize safety. Welding produces intense heat, bright light, and harmful fumes, so it is crucial to take the necessary precautions. Begin by wearing appropriate safety gear, including a welding helmet with a darkened lens, welding gloves, a welding jacket, and steel-toed boots. Additionally, make sure your work area is well-ventilated and free of flammable materials to avoid any potential accidents.
Furthermore, it is recommended to have a fire extinguisher nearby in case of emergencies. Remember, safety should always be your top priority when working with an arc welder.
Step 2: Preparing the Materials
Before you can start welding, you need to prepare the materials properly. Begin by cleaning the metal surfaces that will be welded together. Use a wire brush or a grinder to remove any rust, paint, or debris. This will ensure a clean and solid weld.
Next, carefully measure and mark the areas where the welds will be made. This will help you achieve accurate and precise welds. Use a ruler or a measuring tape to ensure the dimensions are correct. Taking the time to properly prepare the materials will result in stronger and more durable welds.
Step 3: Setting up the Arc Welder
Once the materials are ready, it’s time to set up your arc welder. Start by connecting the electrode holder, also known as the stinger, to the positive terminal of the welder. Then, connect the grounding clamp to the negative terminal. Ensure that all connections are secure to avoid any electrical issues during the welding process.
Next, select the appropriate welding rod for the type of metal you are working with. Different metals require different types of rods, so refer to the manufacturer’s recommendations or consult with an expert if you’re unsure. Insert the welding rod into the electrode holder and tighten it firmly.
Step 4: Executing the Weld
With the materials prepared and the arc welder set up, it’s time to execute the weld. Position the electrode close to the joint, at an angle of approximately 15 degrees. Once you strike an arc by tapping the electrode against the metal, maintain a steady hand and move the electrode along the joint in a slow and controlled manner.
As you move along the joint, ensure that the arc remains stable and the electrode does not touch the metal. Maintain a consistent distance between the electrode and the joint, typically around 1/8 inch. This will help you achieve clean and strong welds.
Continue welding until you have completed the desired length of the joint. Once finished, turn off the arc welder and allow the welded metal to cool down before handling it. Congratulations, you have successfully welded metal with an arc welder!
Step 5: Cleanup and Maintenance
After welding, it is important to clean up the work area and properly maintain your arc welder. Remove any leftover debris or welding slag from the welded metal using a wire brush or a chipping hammer. This will ensure a clean and professional finish.
Additionally, regularly inspect and maintain your arc welder to ensure its optimal performance. Clean the welding tips, check for any loose connections, and replace any damaged parts as needed. By properly maintaining your equipment, you can prolong its lifespan and continue welding with precision.
Step 6: Practice and Improvement
Remember, welding is a skill that improves with practice. The more you weld, the better you will become at controlling the arc and achieving high-quality welds. Take the time to practice on scrap metal before working on important projects to refine your technique and gain confidence.
Furthermore, consider taking welding classes or workshops to enhance your knowledge and skills. Learning from experienced welders can provide valuable insights and help you become proficient in various welding techniques.
Step 7: Exploring Advanced Welding Techniques
Once you have mastered the basics of welding with an arc welder, you can start exploring advanced welding techniques. These techniques include welding in different positions, using different welding rods, and working with various types of metals. Continuously challenging yourself and expanding your welding repertoire will make you a versatile and sought-after welder.
Remember, practice, patience, and a commitment to safety are key to becoming an excellent welder. With dedication and determination, you can master the art of welding metal with an arc welder and unlock endless possibilities for your metalworking projects.
faqs for How To Weld Metal With An Arc Welder:
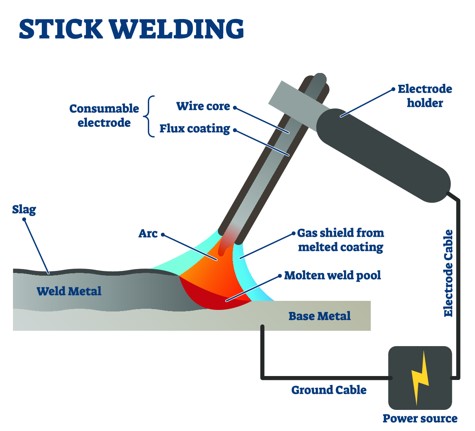
An arc welder is a type of welding machine that uses electricity to create an electric arc between the welding electrode and the metal being welded. This arc produces intense heat, which melts the metal and fuses it together.
The welding electrode, also known as a welding rod, is made of a material that melts at a lower temperature than the metal being welded. As the electrode melts, it creates a filler material that helps join the pieces of metal together.
Arc welding is a versatile and widely used welding process, suitable for various types of metals and thicknesses. It is commonly used in construction, fabrication, and repair work.
When arc welding, it is important to take several safety precautions to protect yourself and others. Here are some essential steps to follow:
1. Wear protective clothing, including a welding helmet with a darkened lens, flame-resistant clothing, gloves, and boots.
2. Ensure proper ventilation in the welding area to prevent the accumulation of harmful fumes and gases.
3. Use a welding curtain or shield to protect nearby objects and people from sparks and flying debris.
4. Keep a fire extinguisher nearby and be aware of the location of emergency exits.
5. Avoid welding in wet or damp conditions to reduce the risk of electric shock.
An arc welder can be used to weld a wide range of metals, including carbon steel, stainless steel, cast iron, aluminum, and copper. The suitability of a particular metal for arc welding depends on factors such as its thickness, composition, and the specific type of electrode used. It is important to choose the correct electrode and welding settings for the specific metal being welded to ensure a strong and durable weld.
Proper preparation of the metal surface is crucial for successful arc welding. Follow these steps to prepare the metal:
1. Clean the metal surface using a wire brush or grinder to remove any rust, paint, or dirt. This ensures good electrical contact and helps create a clean weld.
2. Bevel the edges of the metal if necessary, especially for thicker materials. This allows for better penetration and fusion of the weld.
3. Clamp or secure the metal in the desired position to prevent movement during welding.
4. Ensure that the metal is dry and free from any moisture, as it can lead to welding defects and weak welds.
Welding defects can occur during the arc welding process. Here are some common defects and tips to avoid them:
1. Porosity: This is caused by trapped gas bubbles in the weld. To avoid porosity, make sure the metal is clean and free from any contaminants, and use the correct welding technique and settings.
2. Lack of fusion: This happens when the weld fails to fuse with the base metal properly. To prevent a lack of fusion, ensure proper joint preparation, maintain the correct arc length, and use suitable welding techniques for the type of metal being welded.
3. Cracking: Cracks can occur in the weld due to various factors such as high stress, inadequate preheating, or rapid cooling. To minimize cracking, follow proper preheating and cooling procedures, and use appropriate welding techniques for the specific metal and joint design.
Source: fractory.com
conclusion:
mastering the art of welding metal with an arc welder is a valuable skill that opens up a world of possibilities. Whether you are a professional welder or a DIY enthusiast, understanding the principles and techniques of arc welding can enable you to create durable and reliable metal structures. By following the steps outlined in this guide, you can confidently wield the power of the arc welder and transform raw metal into intricate designs or sturdy constructions.
Remember, practice makes perfect in the world of welding. Don’t be discouraged if your first attempts are less than perfect. With time and dedication, you can refine your skills and become a proficient arc welder. So, embrace the sparks, be patient with yourself, and allow your creativity to soar as you embark on this exciting journey of welding metal with an arc welder. Happy welding!