Master The Art Of Oxy Acetylene Welding: A Step-By-Step Guide
Looking to learn how to weld with oxy acetylene? Look no further, as we’ve got you covered! Welding with oxy acetylene is a versatile and powerful method that allows you to join metal pieces together effectively. This technique involves using a mixture of oxygen and acetylene gases to create a high-temperature flame, which can be precisely controlled for welding purposes. In this article, we’ll guide you through the process of welding with oxy acetylene, providing you with the necessary knowledge and tips to get started. So, let’s dive in and explore the world of oxy acetylene welding together!

How to Weld with Oxy Acetylene
Introduction
Welding is a crucial skill in various industries, and one of the most versatile and widely used methods is oxy acetylene welding. This technique involves using a combination of oxygen and acetylene gases to create a high-temperature flame that can melt and join metal pieces together. Whether you’re a DIY enthusiast or a professional welder, mastering the art of welding with oxy acetylene can open up a world of possibilities. In this comprehensive guide, we will walk you through the step-by-step process, discuss safety precautions, and provide tips and techniques to help you weld with oxy acetylene like a pro.
Section 1: Understanding Oxy Acetylene Welding
1.1 How Oxy Acetylene Welding Works
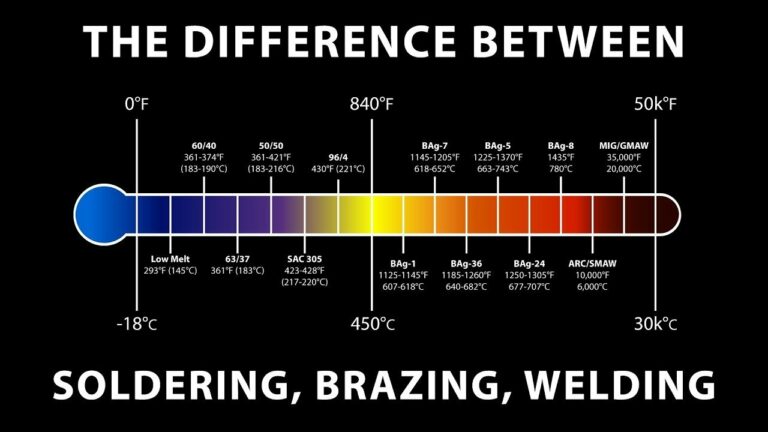
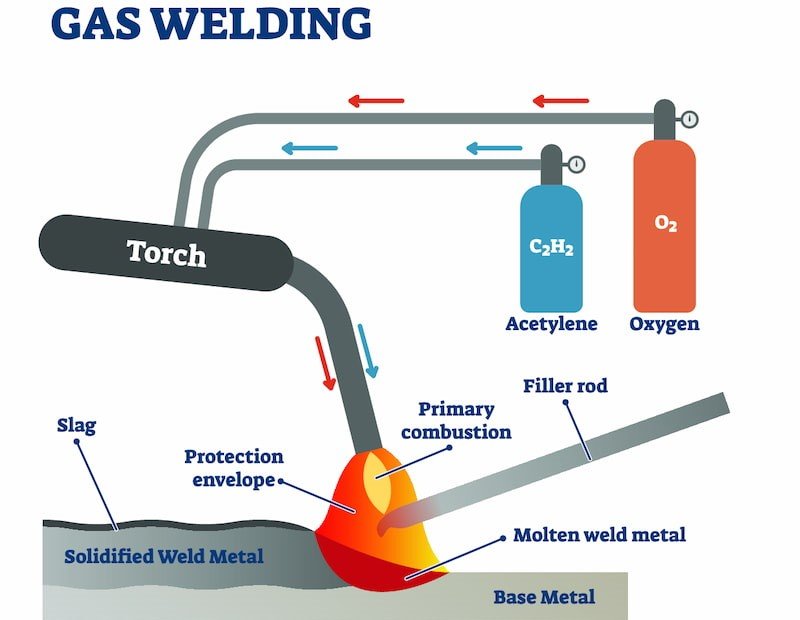
Oxy acetylene welding relies on the controlled combustion of acetylene gas mixed with oxygen to produce a high-temperature flame. The acetylene gas, stored in a cylinder, is combined with oxygen using a torch to create a flame that can reach temperatures of up to 6,000 degrees Fahrenheit. This intense heat melts the metal surfaces, allowing them to fuse together when cooled.
1.2 Advantages of Oxy Acetylene Welding
– Versatility: Oxy acetylene welding can be used on various metals, including steel, aluminum, and bronze.
– Portability: The equipment is relatively portable, making it suitable for on-site repairs or remote locations.
– Control: The flame temperature can be adjusted easily for precise control and weld quality.
– Cost-effectiveness: Oxy acetylene welding equipment is relatively affordable compared to other welding methods.
Section 2: Safety Precautions
2.1 Preparing for Safety
Before you start welding with oxy acetylene, it’s crucial to prioritize safety. Here are some essential safety precautions to follow:
– Work in a well-ventilated area to avoid the buildup of flammable gases.
– Wear appropriate personal protective equipment (PPE), including welding gloves, a welding helmet with a shade, and flame-resistant clothing.
– Have a fire extinguisher nearby and know how to use it.
– Keep a first aid kit readily available.
2.2 Handling Acetylene Gas
While acetylene is a versatile fuel gas for welding, it is highly flammable and requires careful handling. Here are some safety tips specific to acetylene gas:
– Store acetylene cylinders upright and secure them to prevent tipping or falling.
– Check for leaks using a soap solution and never use an open flame for detection.
– Avoid using acetylene near oil, grease, or other flammable substances.
– Adhere to local regulations for handling and storage of acetylene cylinders.
2.3 Working with Oxygen
Oxygen supports combustion, so it’s crucial to handle it safely to prevent accidents. Consider the following when working with oxygen:
– Ensure cylinders are stored in an upright position and properly secured at all times.
– Keep oxygen cylinders away from flammable materials, oil, and grease.
– Use a cylinder cap or valve cover to protect the cylinder valve.
– Regularly inspect oxygen hoses and regulators for damage or leaks.
Section 3: Setting Up the Oxy Acetylene Welding Equipment
3.1 Gathering the Necessary Tools and Equipment
To get started with oxy acetylene welding, you’ll need the following essential tools and equipment:
– Oxy acetylene torch kit: Includes a torch handle, mixing chamber, cutting attachment, regulators, hoses, and tips.
– Oxygen cylinder and acetylene cylinder: Available in various sizes, select cylinders based on your project requirements.
– Safety equipment: Welding helmet, welding gloves, apron, safety glasses, and steel-toed boots.
– Welding table or workbench: Provides a stable surface for your workpiece.
3.2 Assembling the Oxy Acetylene Torch
Proper assembly of the oxy acetylene torch is crucial for safe and efficient operation. Follow these steps:
1. Attach the oxygen regulator to the oxygen cylinder valve and tighten securely.
2. Connect the oxygen hose to the oxygen regulator outlet.
3. Repeat the same process for the acetylene regulator and hose.
4. Attach the torch handle to the end of the hoses, ensuring a secure connection.
5. Install the appropriate welding tip for your project, ensuring it is properly seated in the torch handle.
6. Open the cylinder valves slowly to allow gas flow.
3.3 Adjusting Gas Pressure
To achieve optimal welding results, it’s essential to set the correct gas pressures. Follow these guidelines:
– Adjust the oxygen regulator to the recommended pressure for your torch and tip.
– Set the acetylene regulator to the manufacturer’s recommended pressure.
– Ensure a balanced flow of oxygen and acetylene by adjusting the oxygen and acetylene valve handles on the torch handle.
Section 4: Oxy Acetylene Welding Techniques
4.1 Lighting the Oxy Acetylene Torch
Before lighting the torch, ensure you have the appropriate safety gear on. Follow these steps:
1. Open the acetylene valve on the torch handle approximately 1/4 turn.
2. Hold the torch away from your body and use a friction lighter to ignite the acetylene gas.
3. Adjust the acetylene valve to obtain a small, steady flame.
4. Gradually open the oxygen valve until the flame changes to a bright, well-defined cone.
4.2 Welding Positions
Oxy acetylene welding can be performed in various positions, including flat, horizontal, vertical, and overhead. Consider the following tips for each position:
– Flat: Move the torch in a back-and-forth motion while maintaining a consistent distance and angle.
– Horizontal: Use a slightly shorter arc length and adjust the torch angle to prevent excessive weld penetration.
– Vertical: Weld upward, moving the torch in a slightly upward direction to counteract gravity.
– Overhead: Use a smaller flame and adjust the torch angle to prevent excessive heat buildup.
4.3 Basic Welding Techniques
Mastering basic welding techniques is essential for achieving strong, quality welds. Consider these fundamental techniques:
– Tack welding: Create small welds to hold the workpieces in place before making the final weld.
– Travel speed: Maintain a consistent travel speed to ensure proper fusion of metals.
– Arc length: Keep a steady arc length, typically 1/16 to 1/8 inch, for optimal welding.
– Weaving technique: Use a slight side-to-side motion while moving forward to distribute heat evenly.
Section 5: Common Welding Defects and Troubleshooting
5.1 Welding Defects
Even with proper technique, welding defects can occur. Some common defects include:
– Porosity: Small holes or voids in the weld caused by gas entrapment. Check gas flow and cleanliness of the base metal.
– Undercutting: A groove or depression along the edge of the weldment caused by excessive heat. Adjust heat input and travel speed.
– Cracking: Welds can experience cracking due to inadequate preheat or improper cooling methods. Consider preheating and post-weld heat treatment.
5.2 Troubleshooting Tips
Here are some troubleshooting tips to address common issues:
– Uneven weld bead: Check for inconsistent gas flow, improper arc length, or incorrect travel speed.
– Excessive spatter: Ensure proper gas flow and adjust the torch angle to minimize spatter.
– Lack of fusion: Increase heat input, adjust torch angle, or increase travel speed to achieve proper fusion.
Section 6: Post-Welding Practices
6.1 Cooling and Cleaning
After completing a weld, allow the welded materials to cool naturally, avoiding rapid cooling methods that can lead to stress cracks. Once cooled, clean the weld area using a wire brush or grinder to remove any slag or impurities.
6.2 Weld Inspection
Inspect the weld for any visual defects, such as cracks, porosity, or lack of fusion. Use appropriate inspection tools, such as a magnifying glass or dye penetrant, if necessary. Inspections ensure the quality and integrity of the weld.
6.3 Post-Weld Treatment
Depending on the application or industry requirements, you may need to perform post-weld treatments. These treatments can include stress relieving, heat treatment, or further machining and finishing processes.
Section 7: Advancing Your Oxy Acetylene Welding Skills
7.1 Practice, Practice, Practice
To become proficient in oxy acetylene welding, practice is key. Start with simple projects and gradually work your way up to more complex ones. Take the time to experiment with different techniques and welding positions to build your skills.
7.2 Seek Professional Guidance
Consider enrolling in a welding course or seeking guidance from experienced welders. Their expertise and mentorship can provide valuable insights and help you refine your techniques.
7.3 Explore Other Welding Methods
While oxy acetylene welding is versatile, it’s essential to explore other welding methods such as MIG, TIG, or stick welding. Each technique has its advantages and applications, and expanding your welding knowledge will enhance your overall proficiency.
With the comprehensive knowledge and techniques provided in this guide, you’re well on your way to mastering oxy acetylene welding. Remember to prioritize safety, follow proper procedures, and continuously practice to refine your skills. Whether you’re working on DIY projects or pursuing a career in welding, oxy acetylene welding opens up a world of possibilities to create, repair, and innovate with metals.
Intro to Oxy-Acetylene Welding – Part 1
Frequently Asked Questions
What is oxy acetylene welding and how does it work?
Oxy acetylene welding, also known as oxy-fuel welding, is a process that combines oxygen and acetylene gas to create a high-temperature flame for welding. The acetylene gas is ignited and the oxygen is adjusted to control the flame intensity. The intense heat generated by the flame melts the base metal, allowing the welder to join two pieces of metal together.
What equipment do I need for oxy acetylene welding?
To weld with oxy acetylene, you will need a welding torch, oxygen and acetylene gas cylinders, appropriate hoses and regulators, safety goggles, welding gloves, and a welding apron. It is important to have proper ventilation and a fire-resistant workspace when using oxy acetylene equipment.
How do I set up the oxy acetylene welding equipment?
To set up the equipment, secure the oxygen and acetylene cylinders in an upright position. Attach the hoses to the regulators and connect them to the respective gas cylinders. Adjust the regulator settings to the recommended pressure for your specific welding project. Finally, ignite the torch and adjust the flame to the desired intensity using the oxygen and acetylene valves.
What safety precautions should I take when welding with oxy acetylene?
When welding with oxy acetylene, it’s crucial to wear proper personal protective equipment, such as safety goggles and welding gloves, to protect yourself from sparks, heat, and UV radiation. Ensure proper ventilation in your workspace to prevent the build-up of dangerous gases. Always check the equipment for leaks before use and store the cylinders in a cool, dry, and well-ventilated area away from flammable materials.
What are some tips for achieving good welds with oxy acetylene?
To achieve good welds with oxy acetylene, it is important to have proper control of the flame. Adjust the oxygen and acetylene valves to create a neutral flame, with a well-defined inner and outer cone. Keep the flame at the appropriate distance from the base metal, typically around 1/16 to 1/8 inch, and move the flame evenly along the joint to create a consistent weld. Practice and proper technique will help improve your welding skills over time.
Final Thoughts
In conclusion, mastering the art of welding with oxy acetylene can greatly enhance your fabrication skills. By following proper safety precautions and understanding the correct techniques, you can achieve strong and precise welds. Remember to always start with thorough preparation, including securing the workpiece and cleaning the metal surface. Throughout the welding process, maintaining the correct flame balance and adjusting the torch angle are crucial for optimal results. With practice and dedication, you can become proficient in welding with oxy acetylene, expanding your capabilities in metalwork and fabrication.